Using JW Player as a Data source
Introduction
Applicaster offers an integration with JW Player. This guide will walk you through the following:
- Prerequisites
- Adding a playlist as a feed
- Managing series using JW
- Enabling content Geo-Blocking
- InPlayer integration
Prerequisites
- To Integrate JW you'll need to ask your Customer Success representative to setup JW Middleware for you.
Note We are using Firebase as a middleware to protect you API secrets and to allow to add updates without the need of rebuilding the app.
Provide your Customer Success representative the following JW credentials:
- V1_API_CREDENTIALS_SECRET
Your Customer Success representative will update you once your Middleware server is up and running and will give you a link to your middleware BASE_URL
Create a JW endpoint
- Go to your app Endpoints section

- Create a new JW Endpoint if it doesn't already exists:
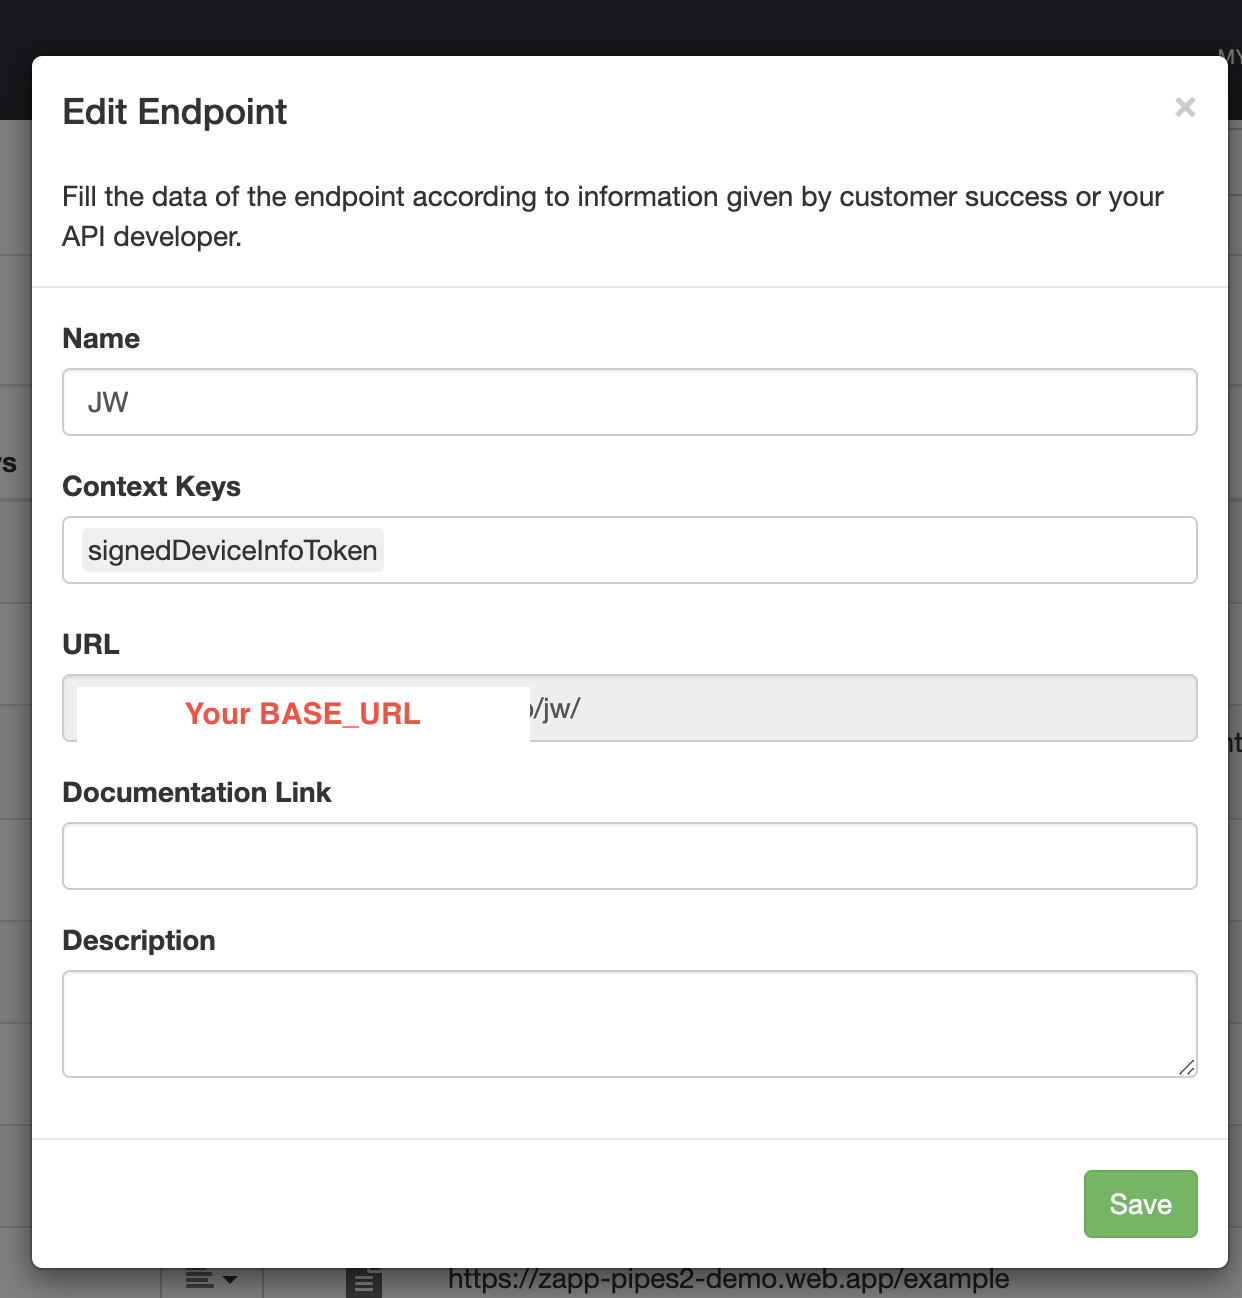
- Name : JW
- Context Keys - leave blank for now
- URL -
<BASE_URL>/jw/(replace the<BASE_URL>with your middleware URL )
Create a simple Playlist feed
Creating Playlist feeds are good for promoting content on your app - e.g. Create a playlist on JW with promoted videos, create from it a feed as described bellow and than add it to your app's home screen.
- Go to the
Layouts V2feeds section and add feeds for your playlists as you see fit
For creating a Series / Episodes structure for dynamic series screen - read the section bellow instead.
- Click on the
New Feedbutton and choosePipes Feed- A modal will pop up. Give your feed a name (the name is for administrative usage, the name will not be reflected in the app).- For the
Endpointpick theJWendpoint your created before. - For the Feed Locator add
playlists/<JW_PLAYLIST_ID>(replace<JW_PLAYLIST_ID>with your desired JW Playlist ID )
- For the
Note you can only used playlists from your JW account - according to the API keys you provided
- Click Create - You can now preview and use the feed on your app.
Create a search feed
- Go to the
Layouts V2feeds section. - Click on the
New Feedbutton and choosePipes Feed- A modal will pop up. Give your feed a name e.g Search (the name is for administrative usage, the name will not be reflected in the app).- For the
Endpointpick theJWendpoint your created before. - For the Feed Locator add
playlists/<JW_SEARCH_PLAYLIST_ID>?search={{q}}(replace<JW_SEARCH_PLAYLIST_ID>with your desired JW Search Playlist id )
- For the
- Click Create.
- Create the search screen on the Studio as described here (Make sure you follow the Layouts2 Guide).
Create an episodic structure using JW Playlists
JW Player supports only the creation of video assets and the ability to group them on playlists.
For each video item JW allows users to add title, description, a single thumbnail, tags and custom params.
To overcome this problem we offer the option to mimic a Series / Episode Hierarchy by creating fake videos of series on JW.
Before you begin if you would like to group episodes directly under a series (see step 1A) or if you prefer to create sub-groups of episodes by seasons (see step 1B)
Step 1A - Create a playlist per series
Note: If you want to group episodes by seasons see
Step 1Binstead.
Follow JW documentation and create a playlist for each series. Use a manual playlist if you would like to manually control the order of the videos.
Note - when uploading the videos to JW it’s recommended to tag each episode with the name of the series - this will make it much easier to group the episodes by their shows as JW offers playlist filtering options by tags.
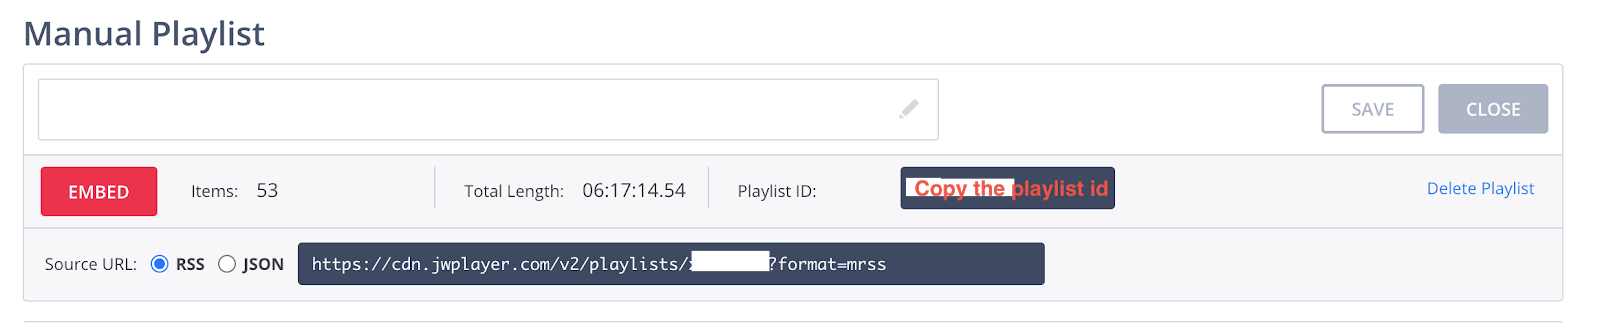
Create a manual feed and name it with the show name.
Then go to the videos section and search for the show’s tag name. Select all the videos and add them to the playlist that you created.


Once done you can order the videos manually as you see fit in the playlist. Lastly copy the playlist Id of the playlist
Step 1B - Create a playlist per seasons
Note: If your content comes directly under series without seasons separation see
Step 1A instead.
Follow JW documentation and create a playlist for each season on a given series. Use a manual playlist if you would like to manually control the order of the videos.
Note - when uploading the videos to JW it’s recommended to tag each episode with the name of the series - this will make it much easier to group the episodes by their shows as JW offers a playlist filtering options by tags.
Create a manual feed and name it with the show name.
It is recommended that you give full meaningful title to your playlist like
<SERIES_NAME> SEASON <SEASON_NUMBER>. This will help you to easily find it later ond
Then go to the videos section and search for the show’s tag name. Then select all the videos that belong to the given season and add them to the playlist that you created.
Once done you can order the videos manually as you see fit in the playlist. Lastly copy the playlist Id of the playlist
Step 2 - Create a show video item
When building apps, it’s very common to provide an image for the series itself, and not only to the episodes in that series. As mentioned above you can only upload an image to a video. So, to overcome this problem we will add a video per series and use it to hold the show metadata. When adding a video to JW, JW requires users to upload a valid video to the video field. To tackle that issue we’ll connect the video to fake video as a placeholder.
Choose the upload button on JW and give a fake URL to your video and pick the option - No, don't host media on import.
Change the title of the video to the title of the series and add the show description to the description field. Click on the “Edit Thumbnail” button to upload the series' thumbnail.
JW supports only opaque thumbnails - please don’t use transparent PNGs for images.
Add to the video a tag named series-item . This will enable filtering show videos easily when searching items on JW.
As mentioned on step 1, you have 2 options to arrange your data; Have all the episodes under the show directly or if your show episodes are separated to seasons, create a playlist per season.
If you group all your episode under the series add a custom param named playlistId and paste the playlist ID of the show you copied previously from your clipboard
If you group the episodes by season create a custom param per season named season1, season2 etc.
And paste the right playlists ids.
Step 3 - Create an “All Series” playlist
To automate the process on Zapp of showing a list of show items in the app. Create an “All Series` playlist on JW and add all the series “Videos” you created.
You can set the order of the shows as you see fit. This order will be maintained on the app.
Step 4 - Create the All-Series feed on Zapp
- Create a new JW feed
- Give your Feed an administrative name e.g. All Series
- For the
Endpointpick theJWendpoint your created before. - For the Feed Locator add
all-series-playlists/<JW_PLAYLIST_ID>(replace<JW_PLAYLIST_ID>with yourAll SeriesPlaylist id you created on step 3)
Step 5 - Create a dynamic JW playlist feed
- Create a new JW feed
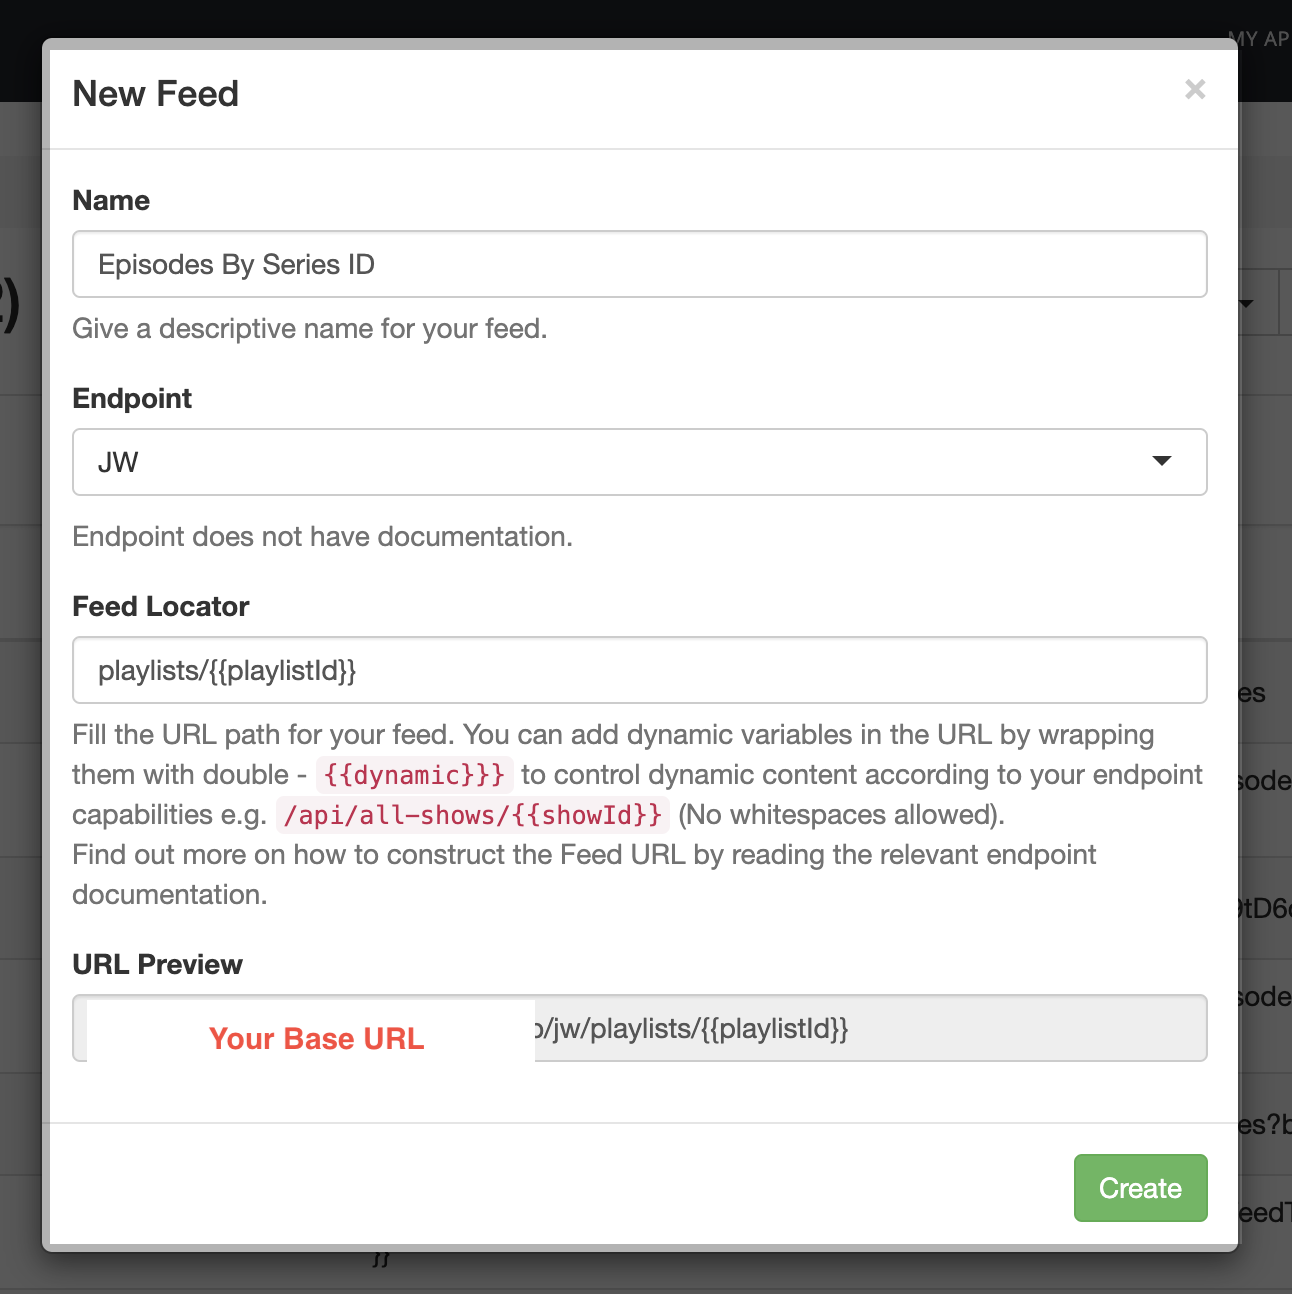
- Give your Feed an administrative name e.g. Episodes
- For the
Endpointpick theJWendpoint your created before. - For the Feed Locator add
playlists/{{playlistId}}
Step 6 - Add All-Series feed to the home screen of your app
- Add the
All-Seriesfeed to a component on Zapp
If you want to show the header use it in a group component
Step 7 - Create a new screen called Series
Option 1 add a single component for all the episodes
- Add a new
general-contentscreen on Zapp - Add to it a component with the
Episodesfeed - Zapp will ask you to set up your
playlistId key- chooseentryand rightextensions.playlistId
Option 2 add component per season
- Add a new
general-contentscreen on Zapp - Add a component per seasons e.g. "Season 1", Season 2" and choose the Episodes feeds
- Per component, Zapp will ask you to set up your
playlistId key- chooseentryand rightextensions.season<THE_WANTED_SEASON_NUMBER?

Step 8 - Map the series screen to the series map
- Open your layout type mapping and set the
seriestype to theseriesscreen you created on step 7.
Your JW integration is now complete
- You can now see all your series listed on the home screen
- Tapping on each series will lead you to the series screen
- Tapping on an episode will open the video player
Appendix 1 - InPlayer integration
InPlayer integration is done behind the scenes - no setup is required on the feeds.
- If you have an integration with InPlayer and you want to offer some videos without the need of login -
just tag those videos with the
freetag in theJWconsole.
Appendix 2 - Geo Blocking
JW does not offer a way to use its Geo-Blocking feature with a server-to-server API.
Step 1
- Remove all Geo-Blocking restrictions for JW
Using Geo Block both on JW and on Zapp might result undesired blocking of content
Step 2
- Add the
signedDeviceInfoTokenTokencontext key to your JW endpoint
Step 3
- Tag any content you want to make available for a specific country with
geo:<country code>, e.g. geo:US will enable content to be seen in the US.
Country codes are defined by ISO 3166-1 alpha-2 (https://en.wikipedia.org/wiki/ISO_3166-1_alpha-2)
- Note that you can add more multiple to an item to allow it in several countries.
- If you don't add any geo tags to your videos they will not be geo restricted.
Set remote favorites and continue watching with inPlayer or Cleeng
This document describes how to set up remote favorites and continue watching for JW customers who use inPlayer or Cleeng for user management.
Prerequisites
- Latest deployment of JW DSP provision
- For Cleeng
enableCleengCWAndFavoritesflag on the DSP provisionPlease ask your Applicaster representative to assist you with the DSP provision setup.
Configuration
Replace <PROVISION_BASE_URL> with your provision URL.
Create the following endpoints (if not already set)
- Favorites Remote:
- Name: Favorites Remote
- URL:
<PROVISION_BASE_URL>/jw/favorites - HTTP Method: GET
- Context Keys:
- Key:
quick-brick-login-flow.access_token - Type:
ctxquery param
- Key:
- Continue Watching Remote:
- Name: Continue Watching Remote
- URL:
<PROVISION_BASE_URL>/jw/continue-watching - HTTP Method: GET
- Context Keys:
- Key:
quick-brick-login-flow.access_token - Type:
ctxquery param
- Key:
- Cloud Events (CW and Favs post):
- Name: Cloud Events
- URL:
<PROVISION_BASE_URL>/jw/events - HTTP Method: POST
- Key:
quick-brick-login-flow.access_token - Type:
ctxquery param
- Key:
- Mime Type:
applicastion/json
- Favorites Remote:
Create the following feeds:
- Favorites Remote:
- URL:
<PROVISION_BASE_URL>/jw/favorites?watchlistId=<WATCH_LIST>
- URL:
- Continue Watching Remote:
- URL:
<PROVISION_BASE_URL>/jw/continue-watching?watchlistId=<WATCH_LIST>
- URL:
- JW Events:
<PROVISION_BASE_URL>/jw/events
- Favorites Remote:
Setting up the Continue Watching and Favorites Action Plugins
- Set the Enable server sync switch on
- Set the remote favorites / continue watching feed to corresponding feeds
- Set the Remote event feed to
<PROVISION_BASE_URL>/jw/events - Set the User identifier storage key to
quick-brick-login-flow.access_token - Leave the
Remote URL (Legacy)on the Favorites Action configuration field blank.